Shipping plays a significant role in how your brand comes off in the customer’s eyes. The customer’s view depends heavily on the speed at which they receive the product and the shipping price they will have to pay for it. If you are a business owner seeking a shipping company that can help your brand achieve a positive view in the customer’s eyes, look no further than WooCommerce Shipping.
The services offer several built-in shipping methods and features that help customers achieve more accurate shipping rates and give them plenty of shipping options to choose from. So, if you are looking for a more detailed guide on WooCommerce Shipping and how to set it up, then this article is for you.
| Table of Content |
Part 1. What is WooCommerce Shipping?
WooCommerce Shipping is one of the best means of shipping your products from where your business operates to your customer’s doorsteps. This shipping service comes with several built-in shipping methods and features, which give customers the option to choose from several different shipping methods, ultimately receiving a price that suits their budget.
While its several shipping options make WooCommerce a great choice, its extendable features make it stand out among its competitors. Want to know about these features? Keep reading below.
Part 2. WooCommerce Shipping Features
One aspect in which WooCommerce excels is understanding the needs and demands of its customer base. Operating for a handful of years, the company has managed to understand what aspects and features would benefit users the most and how they can make their shipping services in line with their needs. This understanding has hence made them develop a few fantastic features that will definitely make them stand out in the market. A few of these features are:
Built into WooCommerce
WooCommerce understands that businesses find it quite frustrating to copy and paste all order details into the fulfillment center. Hence, to make things easier and more efficient, the company has provided all businesses operating with them with built-in WooCommerce Shipping right into their dashboard. This saves so much time and prevents any business from going through the hassle of copying and pasting the order details.
Print and Save
WooCommerce also saves time on shipping by printing its own labels. Hence, one now doesn’t have to wait for their prepared packages to be labeled at the post office. Instead, they can simply drop them off at the post office without having to wait in line. Hence, shipping products to customers would become much easier and hassle-free.
Save Time and Money
As we mentioned above, WooCommerce offers its users a wide range of shipping options. With so many options on hand, users can choose the one that suits their budget. On top of all this, every option that users choose for the shipment of their product ensures quick delivery. Hence, one can expect their parcels on their doorstep in no time.
Part 3. How to Set Up WooCommerce Shipping?
We understand that the above description and features might have intrigued you to set up WooCommerce Shipping as well. Well, if that is the case, and you want to know how to set up WooCommerce Shipping, then all you have to do is follow the simple steps that we have mentioned below:
How to Set Up WooCommerce Shipping Zones?
Here is how you can set up WooCommerce Shipping Zones:
Go to Shipping Location(s) in the Dashboard
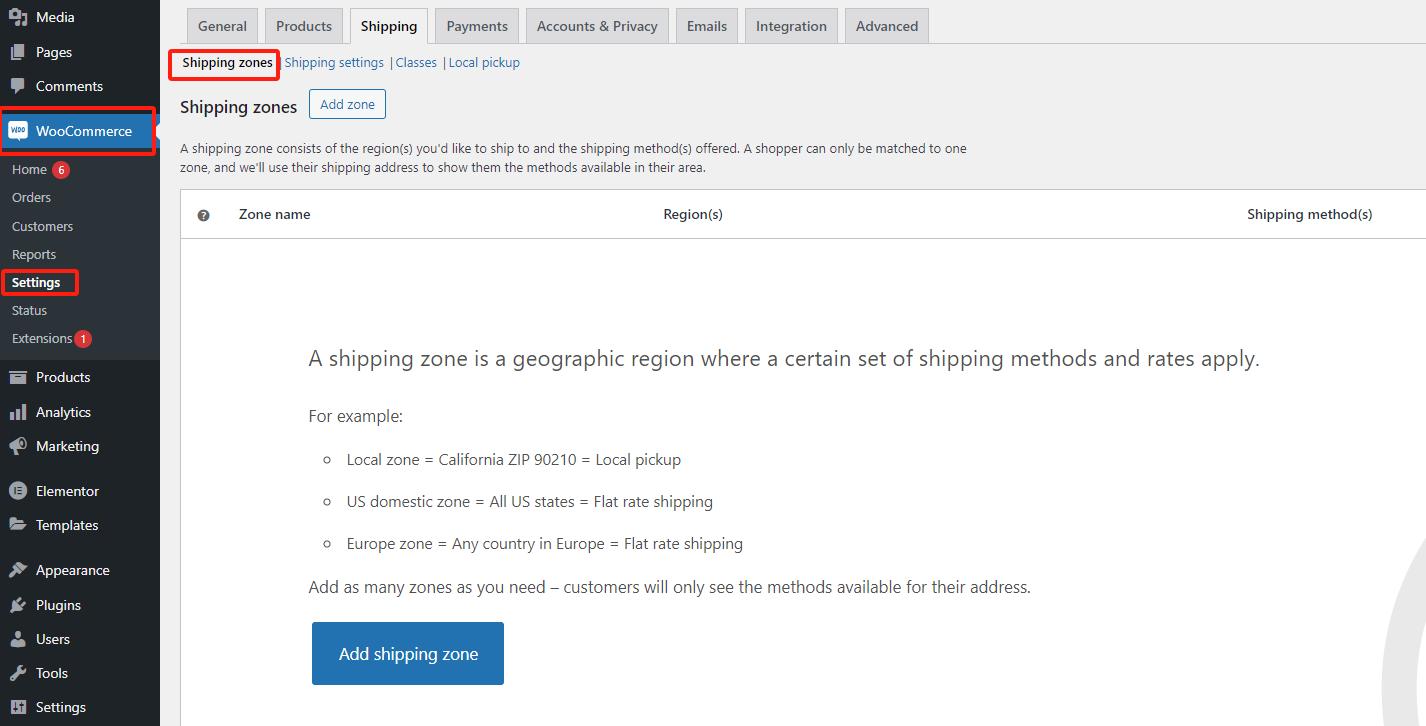
Go to the WordPress dashboard and choose WooCommerce > Settings. Scroll down, and you will see a field marked with ”Shipping Location(s). ”This option will help you select the countries to which you want to ship.
Go to Shipping > Add Shipping Zone
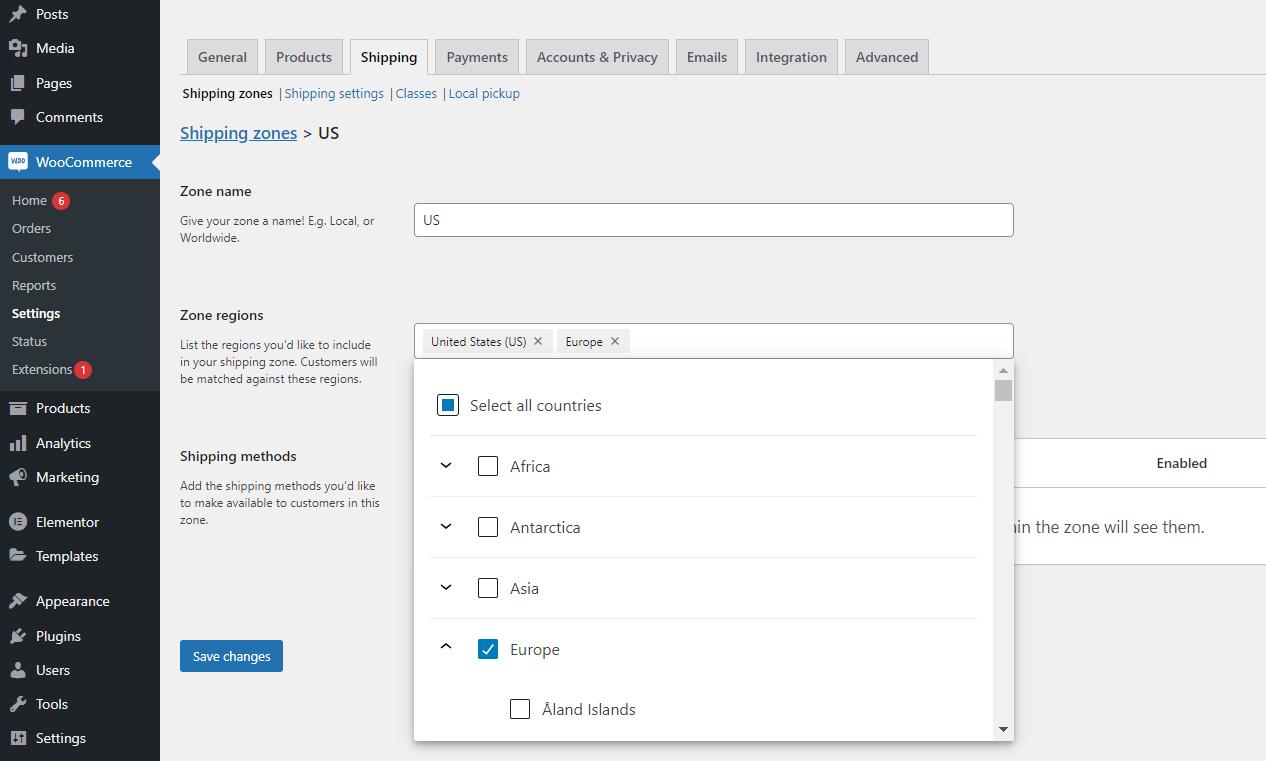
When you’re you’re done setting your shipping locations, go to the Shipping Tab and select ”Add Shipping Zone.” This is the section where a business defines the shipping zone for its e-commerce store.
Add ”Shipping Methods” to Each Zone
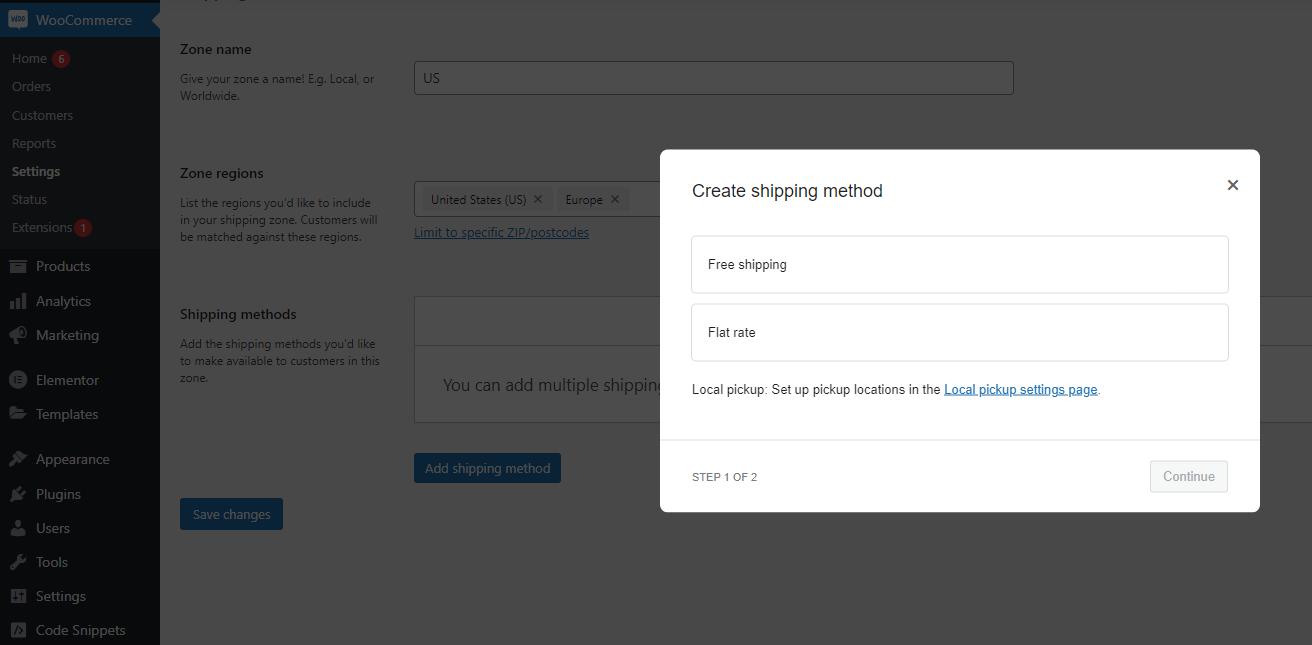
Lastly, you will be required to assign shipping methods to your shipping zone. Depending on how you choose to fulfill orders on your WooCommerce store, the shipping methods can range from flat-rate shipping to local order pickup to free shipping and more.
How to Set Up WooCommerce Shipping Rates?
Here is how you can set up the WooCommerce Shipping Rates:
Choose a Shipping Zone
Go to the Shipping Tab and Choose the Shipping Zone section under it to select the Zone for which you want to set up the flat-rate shipping.
Create Flat-Rate Shipping Fees
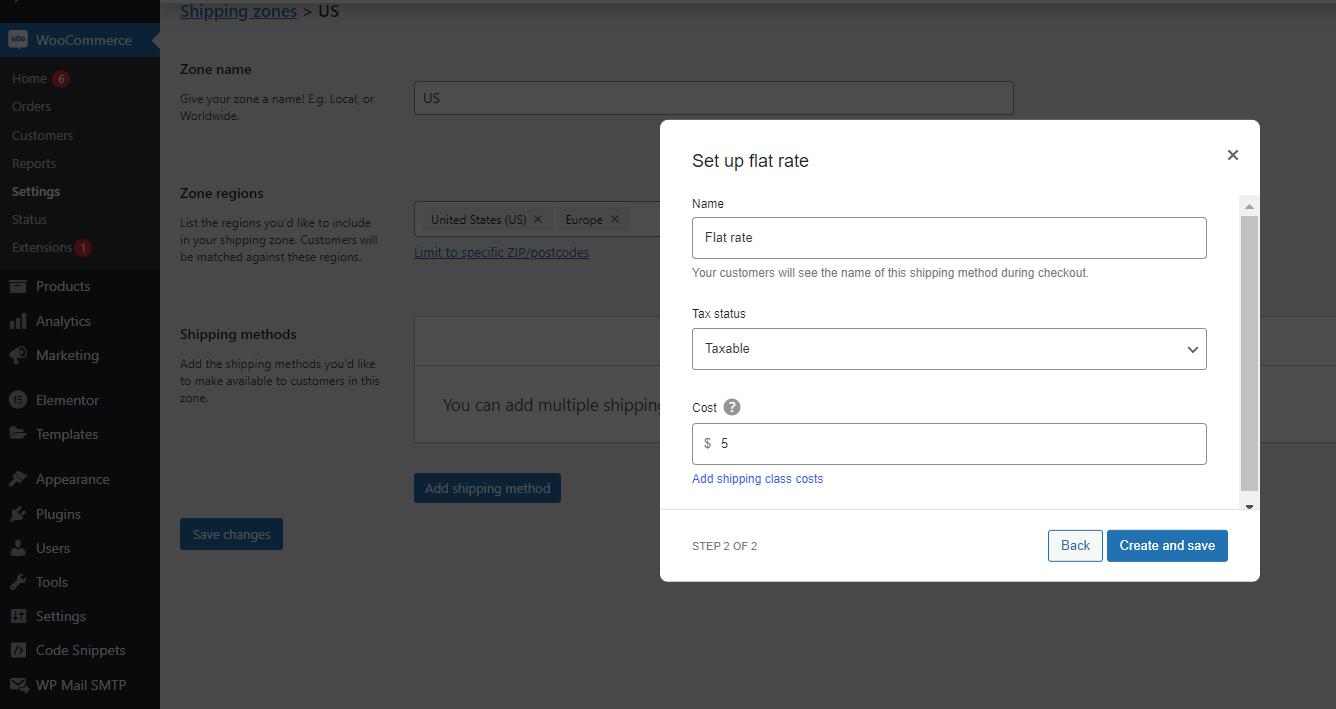
Once you have selected your shipping zone and the flat-rate shipping method, you will not be ready to set up the WooCommerce flat-rate shipping fee. Click on the ”Flat Rate” in the Method box to do this. The shipping fees can be set up in several different ways, including:
1. Flat Shipping Fee Order
2. Flat Shipping Fee Per Item
3. Shipping Fee as per % of the Order Total
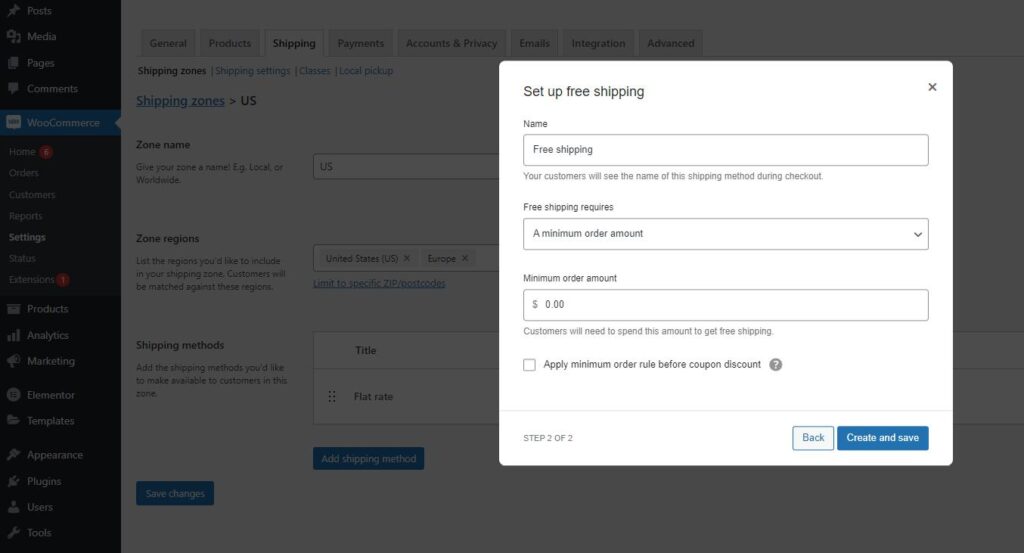
Create Free Shipping
You can also set up free shipping for your products.
How to Set Up Product-Specific Charges with WooCommerce?
Once you have all your zones and rates set up, you can move on to setting up classes for specific products. These classes are used to assign different shipping rates to different types of products. Here is how you can set it up:
Go to Shipping > Shipping Classes
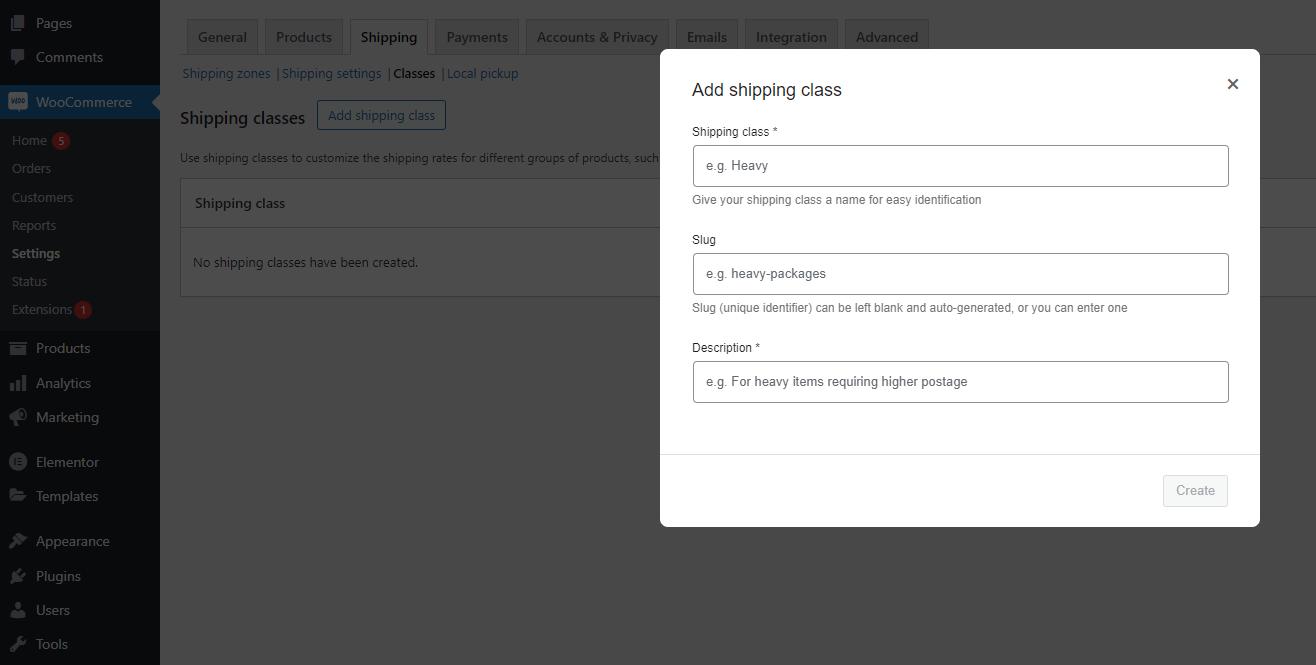
Under the Shipping tab in your WooCommerce Settings, click on the ”Add Shipping Class.”
Fill Out Shipping Class Information
Now, enter the shipping class name and the description of the class. You can also leave the slug field blank, and WordPress will automatically generate the name and description for you. Then, select ”Save Shipping Classes.”
Add Shipping Class Costs to Shipping Zones
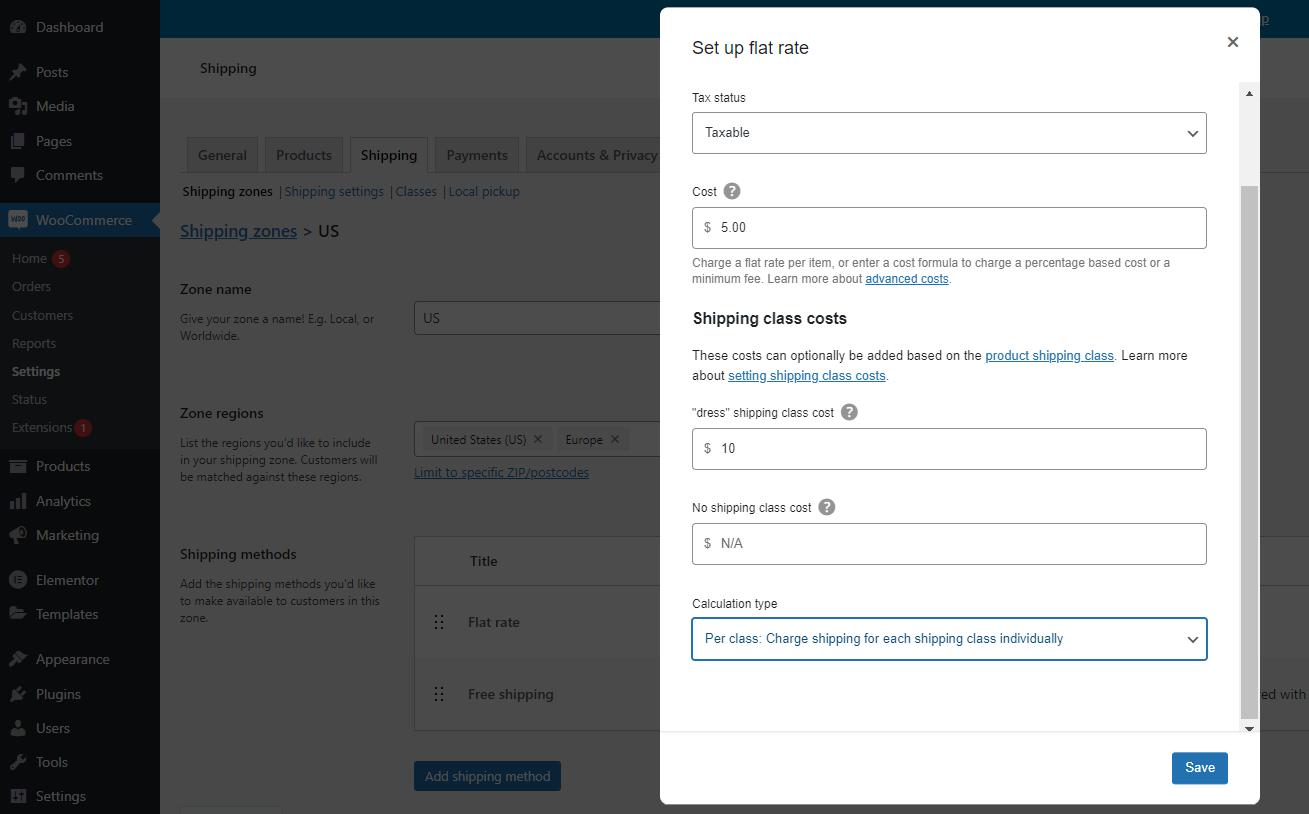
Next, assign each shipping class to a shipping zone and rate. This would help WooCommerce understand which shipping zone and cost to display when a customer purchases a particular product.
In the Shipping tab, choose the Shipping Zones and select the Zone where you want to edit the rate of the shipping class. Now, click on the rate you’d like to edit and finalize.
Assign Shipping Classes to Products
Once your shipping classes and prices have been defined, it will be time to add the products. This means that if you have a shipping class specifically defined and prices for heavy or bulky items, then you’d want to assign the rate to each item that you believe falls into that category. Here is how you can do this:
1. Go to WooCommerce > Products
2. Now, select the product to which you want to assign a rate and click edit.
3.Choose ”Shipping” on the left-hand menu.
4. You will see a dropdown labeled ”Shipping Class.” Here, choose the class to which you would like to add a product.
5. Lastly, tap on the ”Update” button to save changes.
Part 4. Setting WooCommerce shipping quickly with 3PL
Here is how you can register, integrate, and ship WooCommerce with the best 3PL shipping service, also known as NextSmartShip:
Register
Go to nextsmartship.com and click on the ”sign up for free” button. Fill in your basic information and click Sign up to proceed to the next step. Here, you will be required to complete information about your online store, which will help NextSmartShip serve you better. Now, click submit.
Integrate
Another interface will open, requiring you to choose the platform you want to integrate with your online store. After integration, all products and orders will be automatically synchronized. Users can also select the “skip this step” option if they want to integrate later. Ensure that for WooCommerce, you can only integrate by entering the store URL in the NextSmartShip OMS.
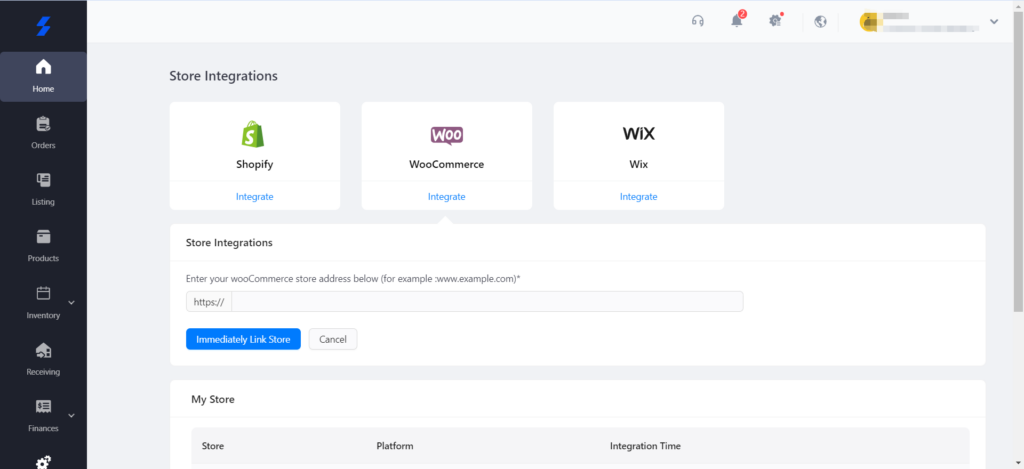
Shipping
Once done, you can now start shipping from NextSmartShip in integration with WooCommerce.
Conclusion
There is no denying that over the years, WooCommerce, with its exceptional services and shipping rates, has made quite an impact on the shipping world and how many customers view the e-commerce business. If you are someone who wants to gain brief information on WooCommerce Shipping, then we hope this article was helpful for you. However, while this service is fantastic, it works even flawlessly in integration with NextSmartShip. So, if you are a business owner searching for the best means to ship, then take a look at the NextSmartShip website.


